For me, it is usually a treat to eat freshly steamed fish on special occasions, such as Chinese New Year or out for a banquet dinner. During a regular visit to my mother-in-law's in SF, we stopped by Chinatown (our usual hangout spot), devoured some delicious dim sum from our favorite restaurant, Great Eastern Restaurant (yes, where the President was this past February!), and went grocery shopping on the busy and crazy Stockton Street. Both my mother-in-law and I bought a fresh big catfish to eat for dinner. You can truly taste the freshness in each bite!
Steamed Catfish with Black Bean Garlic Sauce
Ingredients
- 1 fresh catfish
- 3 cloves of garlic, minced
- 1 Tbsp garlic black bean sauce
- 2 tsp soy sauce
- 2 tsp rice wine
- 1 stalk green onion, thinly sliced
Steps
1. Wash fish thoroughly. Pat to dry.
2. Mix minced garlic, garlic black bean sauce, soy sauce, and rice wine together. Place washed fish on plate and pour mixture all of the fish.
3. Fill a large pot with water. Ensure that you have a stand or some type of device that can place a plate on top, in order to steam the fish. Turn heat to medium and let it cook and steam for about 20 minutes. The fish should be flaky when done.
4. Place thinly sliced green onions on top of the fish and serve. Serves 2-4.
Showing posts with label Seafood. Show all posts
Tuesday, April 24, 2012
Monday, October 3, 2011
Holding On To Summer... Grilled Cedar Plank Salmon
I don't want the nice summery weather to end! I may be speaking for everyone that we are truly enjoying the breezy and nice 75 to 85 degrees weather of late, so nice summer weather, just stay, OK?
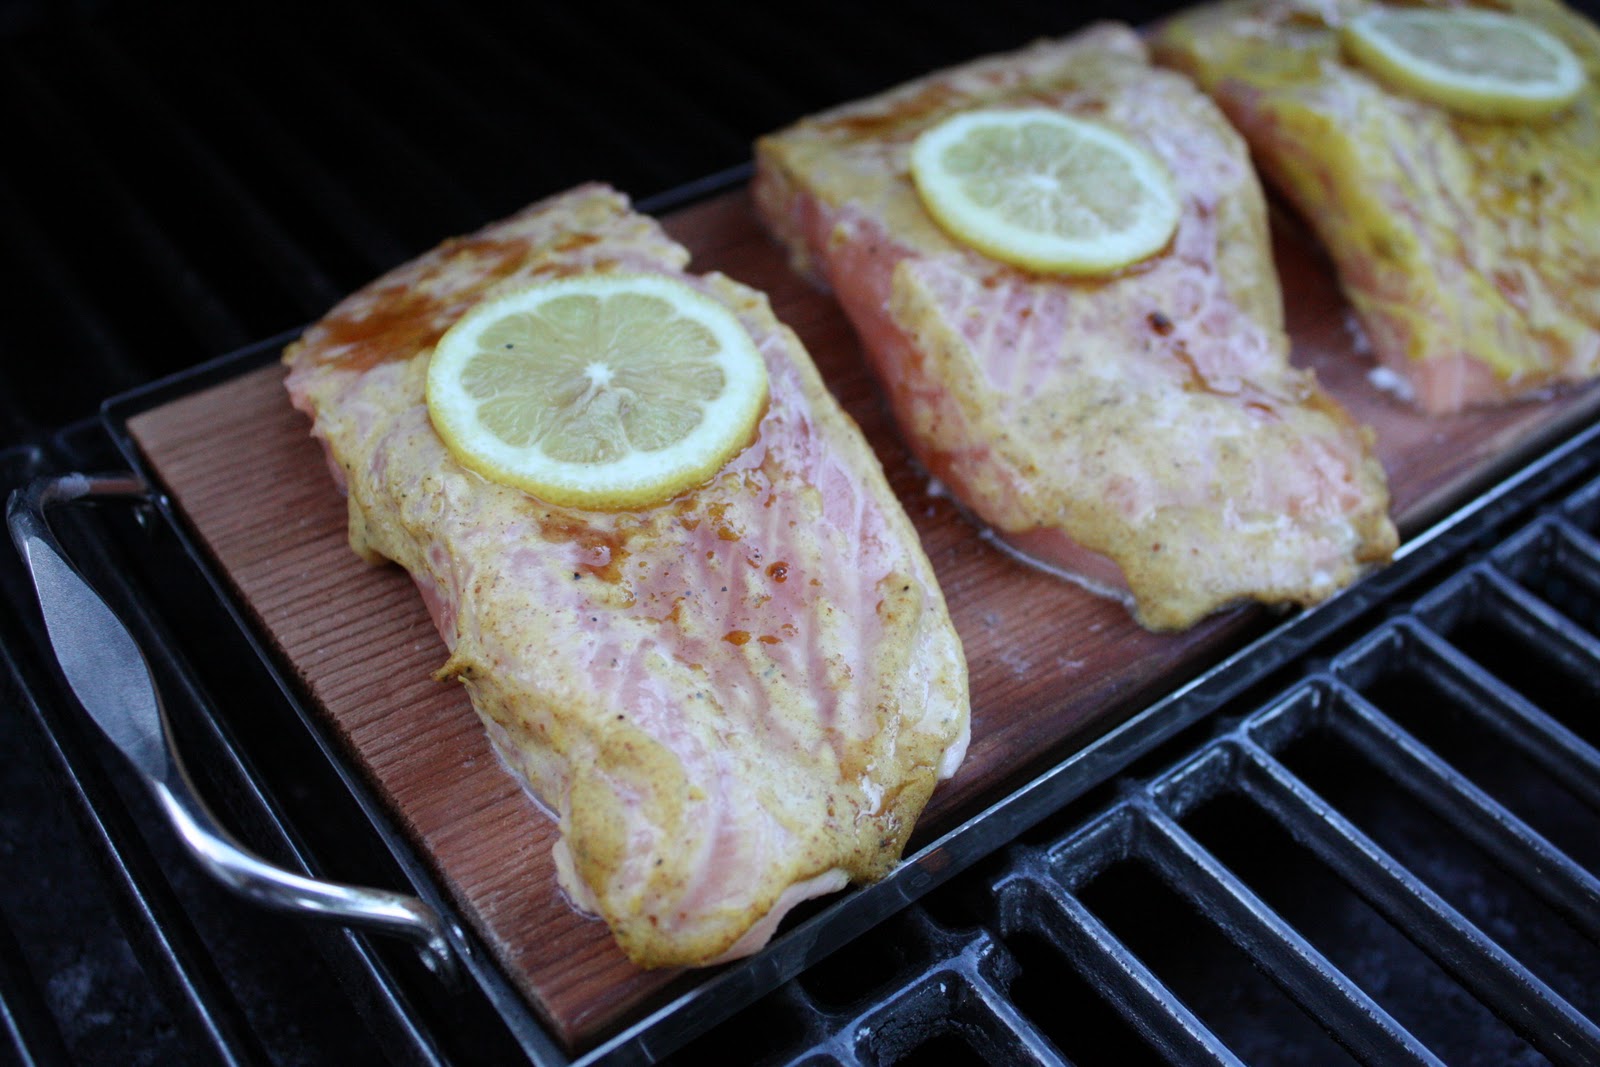
During a recent staycation to Monterey, I stopped by Sur La Table and picked up some new toys. I blame this shopping spree on the $10 coupon that Sur La Table mailed to me a few weeks ago, indicating that I can get anything and receive a nice $10 off discount! How could I resist? I bought a cedar plank, a plank tray, and a $2 zester after rummaging through the clearance pile. Total damage? 6 dollars! I have been longing to own wood planks for cooking fish, ever since we bought our grill a few years ago. It brings great flavor to the fish, and honestly, I think it just looks cool while cooking. This cedar plank salmon did not disappoint!
Cedar Plank Salmon
From BBQ with Bobby Flay, Food Network
Tools
- Cedar plank (carefully read preparation and after cooking instructions to ensure longevity of the wood)
- Plank tray (optional. I thought it was a good idea to get one so that I will not have to replace the plank too often. Besides, it was $10, so technically it was free. ^_^)
and also paired with my lazy salad (delegated the salad to my younger sister to make!)
During a recent staycation to Monterey, I stopped by Sur La Table and picked up some new toys. I blame this shopping spree on the $10 coupon that Sur La Table mailed to me a few weeks ago, indicating that I can get anything and receive a nice $10 off discount! How could I resist? I bought a cedar plank, a plank tray, and a $2 zester after rummaging through the clearance pile. Total damage? 6 dollars! I have been longing to own wood planks for cooking fish, ever since we bought our grill a few years ago. It brings great flavor to the fish, and honestly, I think it just looks cool while cooking. This cedar plank salmon did not disappoint!
Cedar Plank Salmon
From BBQ with Bobby Flay, Food Network
Tools
- Cedar plank (carefully read preparation and after cooking instructions to ensure longevity of the wood)
- Plank tray (optional. I thought it was a good idea to get one so that I will not have to replace the plank too often. Besides, it was $10, so technically it was free. ^_^)
Monday, August 8, 2011
Fishy Noodles
I feel adventurous lately, and it's paying off! Fish roe has become a new favorite item for me, and I really enjoy eating Japanese-style pasta every now and then. I usually only get Japanese pasta at the restaurants, but when I saw easy sauce packs at the local Japanese supermarket, I had to give it a try. Adding a couple of little twists, I use udon noodles instead and added some green peas. The end result? The hubby approves.
Spicy Mentaiko Udon
Ingredients
- 1 pack S&B Spicy Cod Roe Spaghetti Sauce and 1 pack of seaweed strips (package contains 2 packs of sauce and seaweed strips)
- 2 packs of udon noodles, frozen
- 1/4 cup frozen green peas
- 2 eggs
- 2 tsp olive oil (per egg)
Steps
1. Bring a pot of water to boil and drop in frozen udon noodles and frozen peas for 2 minutes (and no longer! Don't worry if the water doesn't boil again). Drain water and place udon and peas in a big bowl.
2. Add the pack of spicy cod roe sauce to the noodles and toss. Separate noodles into 2 bowls or plates.
3. Heat a pan with 2 tsp olive oil and fry the egg, about 1-2 minutes on each side (you want a runny yolk for this dish). Repeat for the second egg.
4. Place fried egg on top of noodles and add seaweed strips.
Serves 2.
Spicy Mentaiko Udon
Ingredients
- 1 pack S&B Spicy Cod Roe Spaghetti Sauce and 1 pack of seaweed strips (package contains 2 packs of sauce and seaweed strips)
- 2 packs of udon noodles, frozen
- 1/4 cup frozen green peas
- 2 eggs
- 2 tsp olive oil (per egg)
Steps
1. Bring a pot of water to boil and drop in frozen udon noodles and frozen peas for 2 minutes (and no longer! Don't worry if the water doesn't boil again). Drain water and place udon and peas in a big bowl.
2. Add the pack of spicy cod roe sauce to the noodles and toss. Separate noodles into 2 bowls or plates.
3. Heat a pan with 2 tsp olive oil and fry the egg, about 1-2 minutes on each side (you want a runny yolk for this dish). Repeat for the second egg.
4. Place fried egg on top of noodles and add seaweed strips.
Serves 2.
I paired the noodles with homegrown cherry tomatoes salad. So sweet.
Wednesday, April 20, 2011
Slow-Cooked Salmon Fillets
Getting ready for the hot weather, try these refreshing salmon fillets accompanied with a variety of different vegetables and fruits. The green, the orange, and the red... this dish is popping with color and, of course, taste! If you are not one liking to eat hard and dry salmon, the way to go is slow-cooking which leaves the texture and flavors tightly stored in the salmon. You can basically eat salmon raw (sashimi, yeah!!), therefore this method of cooking will not harm your body. I love this dish.
Slow-Cooked Salmon Fillets
from Steamy Kitchen
I used the following ingredients and sauce mixture on these salmon fillets. The rest of the steps can be found at the link!
Ingredients
- 2 salmon fillets
- 1 orange, thinly sliced
- 1/2 small red onion, thinly sliced
- 1 small carrot, diced
(I actually had 3 fillets so I just cooked them all, but the ingredients listed are adjusted for 2)
Sauce:
- 2 Tbsp olive oil
- 1/2 tsp salt
- 1/2 tsp pepper
- 1 Tbsp brown sugar
Slow-Cooked Salmon Fillets
from Steamy Kitchen
I used the following ingredients and sauce mixture on these salmon fillets. The rest of the steps can be found at the link!
Ingredients
- 2 salmon fillets
- 1 orange, thinly sliced
- 1/2 small red onion, thinly sliced
- 1 small carrot, diced
(I actually had 3 fillets so I just cooked them all, but the ingredients listed are adjusted for 2)
Sauce:
- 2 Tbsp olive oil
- 1/2 tsp salt
- 1/2 tsp pepper
- 1 Tbsp brown sugar
Monday, March 28, 2011
Just Pictures: No Fish Consumed at Fish
A couple of months ago, we went to explore what the Bay Area has to offer. We left early in the morning for the Ferry Building in SF, and took the ferry to Sausalito. This day of out and about had it's ups and downs... it was fun exploring a new city, getting off our lazy bums to go out and actually work our legs, and of course, lunch! However, after our amazing lunch, we walked out of the restaurant and into the cold, wind, and rain. We left Sausalito many hours ahead of schedule, as we were not prepared for the rain that day. A bit unfortunate, but hey, can't have them all...
Portuguese Red Clam Chowder
Crab Roll (no joke... all crab, no fillers)
Grilled Calamari Mixed Greens Salad
Fish // Sausalito, CA
Saturday, March 26, 2011
Shrimp Kebabs (and wishing Summer was here already...)
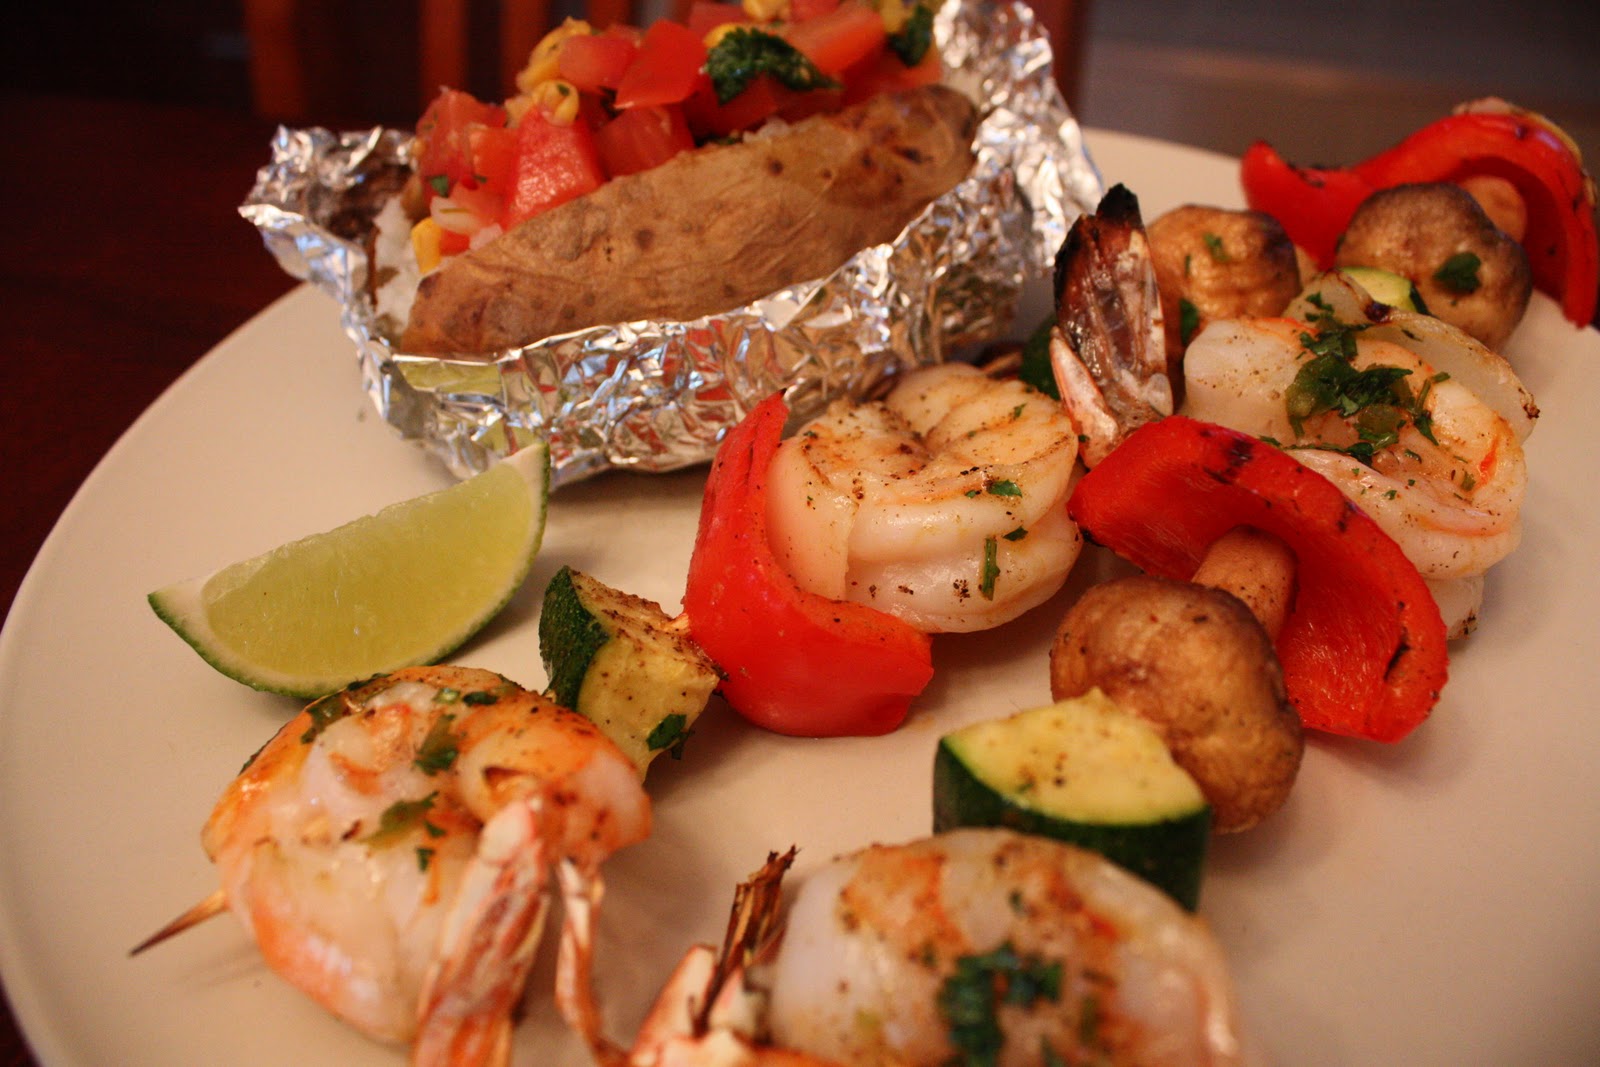
I'm digging this recipe out of the archives. Obviously, we made this during one of the nice and hot summer evenings last year, using our outdoor grill whenever we got the chance. A super simple recipe and light meal, I remember eating and smiling at the same time this day. It is also pretty darn healthy, since the ingredients only consists of shrimp and tons of veggies. Next time there is a delightful warm day, give these kebabs a try!
Shrimp Kebabs
Ingredients
Kebab:
- 1 lb of medium-sized shrimp, washed, peeled (leaving only tail on), and deveined
- 1 red peppers, cubed
- 1 medium zucchini, cubed
- 1 box of cremini mushrooms
- 1/2 yellow onion, cubed
- pinch of salt and pepper
- 2 tsp olive oil
Sauce:
- 2 Tbsp butter, melted
- 4 garlic, finely minced
- 1/4 cup of fresh parsley, chopped
- 1/2 tsp salt
- 1/2 tsp pepper
Tools
- soaked skewers (soaked for at least 1 hour)
- grill
- grilling basket (optional)
Steps
1. In a large bowl, toss all of the kebab items with a pinch of salt and pepper and olive oil.
2. Start assembling the kebabs using the pre-soaked skewers. Line items in any desired order. For example, first start with a shrimp --> red pepper --> cremini mushroom --> shrimp --> yellow onion --> zucchini --> shrimp. Note: to secure the shrimp on the skewer, poke through the tail end and then the body of the shrimp.
3. Prepare the sauce by combining melted butter, garlic, parsley, salt and pepper.
4. Pre-heat the grill (if you have a gas grill, turn the temperature to medium high). If you have this tool, place the kebabs in a grilling basket for ease of grilling. Once the grill is hot, place kebabs on the grill. It should take about 10-15 minutes to cook. Place a close eye on these while cooking... just in case! When the kebabs are close to done, brush the kebabs with the prepared butter sauce.
Serves 2.
Shrimp Kebabs
Ingredients
Kebab:
- 1 lb of medium-sized shrimp, washed, peeled (leaving only tail on), and deveined
- 1 red peppers, cubed
- 1 medium zucchini, cubed
- 1 box of cremini mushrooms
- 1/2 yellow onion, cubed
- pinch of salt and pepper
- 2 tsp olive oil
Sauce:
- 2 Tbsp butter, melted
- 4 garlic, finely minced
- 1/4 cup of fresh parsley, chopped
- 1/2 tsp salt
- 1/2 tsp pepper
Tools
- soaked skewers (soaked for at least 1 hour)
- grill
- grilling basket (optional)
Steps
1. In a large bowl, toss all of the kebab items with a pinch of salt and pepper and olive oil.
2. Start assembling the kebabs using the pre-soaked skewers. Line items in any desired order. For example, first start with a shrimp --> red pepper --> cremini mushroom --> shrimp --> yellow onion --> zucchini --> shrimp. Note: to secure the shrimp on the skewer, poke through the tail end and then the body of the shrimp.
3. Prepare the sauce by combining melted butter, garlic, parsley, salt and pepper.
4. Pre-heat the grill (if you have a gas grill, turn the temperature to medium high). If you have this tool, place the kebabs in a grilling basket for ease of grilling. Once the grill is hot, place kebabs on the grill. It should take about 10-15 minutes to cook. Place a close eye on these while cooking... just in case! When the kebabs are close to done, brush the kebabs with the prepared butter sauce.
Serves 2.
Two shrimp kebabs with a side of salsa-topped baked potato and a slice of lime.
Monday, March 21, 2011
Wontons, I Want A Ton!
On a rainy and cold day like this, I crave anything soup! The past few days I have been consuming a lot of warm liquidy type of food, starting the past weekend with cheese fondue, to Mongolian hot pot, and then Japanese ramen. This wonton recipe is a perfect "gloomy weather" comfort food when you just want to stay in on a lazy Sunday. It's easy to make and quick to cook. The only part you have to be patient with is the wonton-wrapping process. If you can trick someone into helping you along during the wrapping process, if it's a loved one, friends, or capable kids, it can be turn into a fun activity!
Wontons (餛飩)
Ingredients
Wonton:
- 1 pound ground pork (or ground turkey for a healthier option, or a mix of both)
- ~10 medium sized shrimp, peel and ground
- 2 stalks scallion, finely minced
- 3 Tbsp soy sauce
- 2 tsp salt
- 2 tsp rice vinegar
- 1 Tbsp sesame oil
- 1 tsp sugar
- 2 tsp cornstarch
- 1/2 pound wonton wrappers, medium thickness (1 packet from Asian supermaket)
- 1/2 cup cold water
Soup:
- 3 cups of meat broth (pork, chicken, or beef - it's up to you!)
- 2 stalks of celery, sliced (Chinese celery is the best for this soup, so if you can get them, use about 2-3 stalks)
- salt to taste
- dash of white pepper (optional)
Tools
- food processor
- large pot for boiling
- large plates/trays for holding wrapped wontons
Steps
1. In a big bowl, mix together ground pork, ground shrimp (best to use a food processor), scalion, soy sauce, rice vinegar, cornstarch, sugar, and sesame oil.
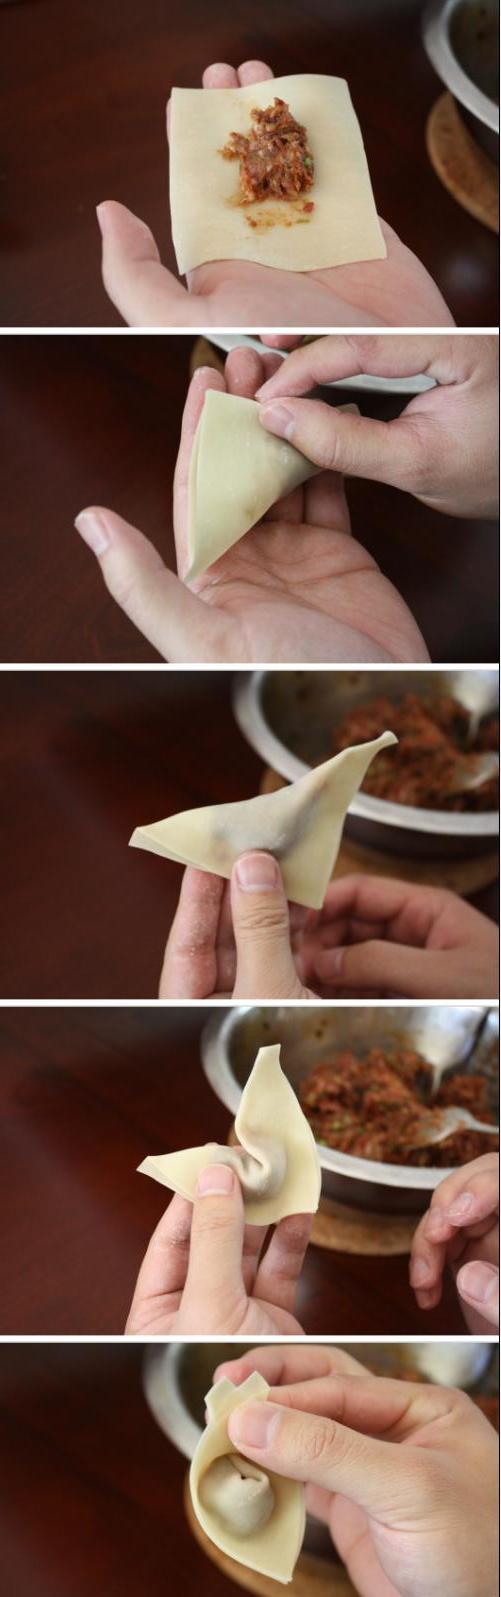
2. Bring the bowl of mixed wonton filling, wonton wrappers, and 1/2 cup of cold water, large plates, and a couple of small spoons to a large area (eg. dining table or large counter) for the wrapping process. Follow the pictures and instructions below on how to wrap a wonton:
(a) Using the small spoon, scoop filling on the wonton wrapper. Note - don't scoop too much, or else it will be difficult to close the wonton and it may break open during the cooking process.
(b) Using your finger, dip in the cold water and line all 4 sides of the wonton wrapper with water. Fold the wonton in half to form a triangle.
(c) Roate the triangle so that the top corner is facing down. Dab water on both corners of the wonton (left corner and right corner only).
(d) Push down the middle of the wonton with your finger and form a small crease.
(e) Stick the two corners together (that's why we dabbed water on those corners) to form a wonton! Make sure to press hard to ensure the corners are sticking to each other.
3. Bring a large pot of water to boil. Once the water is boiling, drop in desired number of wontons to cook (per person, ranges around 6-8 wontons). When the water comes to a boil again, add 1/2 cup of water to the pot. Once the water comes to a boil again and the wontons are plump and floating on top of the boiling water, it is ready.
4. Bring the broth to a boil in another pot. Once boiling, add in celery and cook for about 3-4 minutes. Add salt to taste.
5. Place broth in a bowl and add the cooked wontons. Add white pepper (optional).
Serves many.
A few tips...
...this recipe will make lots of wontons and it may not be possible to eat them all in one sitting, so you can freeze these for next time. To freeze fresh wontons, stick them in the freezer individually (meaning that each wonton should have their own space and no wontons are touching each other). I typically stick the plate I placed the wontons on in the freezer. After the wontons are frozen, you can move them into a ziplock bag or container.
...when cooking frozen wontons, make sure you place wontons in boiling water. When the water comes to a boil again, add 1/2 cup of water to the pot. Do this for 2 more times to ensure the filling is thoroughly cooked. When the wontons are plump and float to the top of boiling water, this means they are ready!
Wontons (餛飩)
Ingredients
Wonton:
- 1 pound ground pork (or ground turkey for a healthier option, or a mix of both)
- ~10 medium sized shrimp, peel and ground
- 2 stalks scallion, finely minced
- 3 Tbsp soy sauce
- 2 tsp salt
- 2 tsp rice vinegar
- 1 Tbsp sesame oil
- 1 tsp sugar
- 2 tsp cornstarch
- 1/2 pound wonton wrappers, medium thickness (1 packet from Asian supermaket)
- 1/2 cup cold water
Soup:
- 3 cups of meat broth (pork, chicken, or beef - it's up to you!)
- 2 stalks of celery, sliced (Chinese celery is the best for this soup, so if you can get them, use about 2-3 stalks)
- salt to taste
- dash of white pepper (optional)
Tools
- food processor
- large pot for boiling
- large plates/trays for holding wrapped wontons
Steps
1. In a big bowl, mix together ground pork, ground shrimp (best to use a food processor), scalion, soy sauce, rice vinegar, cornstarch, sugar, and sesame oil.
2. Bring the bowl of mixed wonton filling, wonton wrappers, and 1/2 cup of cold water, large plates, and a couple of small spoons to a large area (eg. dining table or large counter) for the wrapping process. Follow the pictures and instructions below on how to wrap a wonton:
(a) Using the small spoon, scoop filling on the wonton wrapper. Note - don't scoop too much, or else it will be difficult to close the wonton and it may break open during the cooking process.
(b) Using your finger, dip in the cold water and line all 4 sides of the wonton wrapper with water. Fold the wonton in half to form a triangle.
(c) Roate the triangle so that the top corner is facing down. Dab water on both corners of the wonton (left corner and right corner only).
(d) Push down the middle of the wonton with your finger and form a small crease.
(e) Stick the two corners together (that's why we dabbed water on those corners) to form a wonton! Make sure to press hard to ensure the corners are sticking to each other.
4. Bring the broth to a boil in another pot. Once boiling, add in celery and cook for about 3-4 minutes. Add salt to taste.
5. Place broth in a bowl and add the cooked wontons. Add white pepper (optional).
Serves many.
A few tips...
...this recipe will make lots of wontons and it may not be possible to eat them all in one sitting, so you can freeze these for next time. To freeze fresh wontons, stick them in the freezer individually (meaning that each wonton should have their own space and no wontons are touching each other). I typically stick the plate I placed the wontons on in the freezer. After the wontons are frozen, you can move them into a ziplock bag or container.
...when cooking frozen wontons, make sure you place wontons in boiling water. When the water comes to a boil again, add 1/2 cup of water to the pot. Do this for 2 more times to ensure the filling is thoroughly cooked. When the wontons are plump and float to the top of boiling water, this means they are ready!
Saturday, May 15, 2010
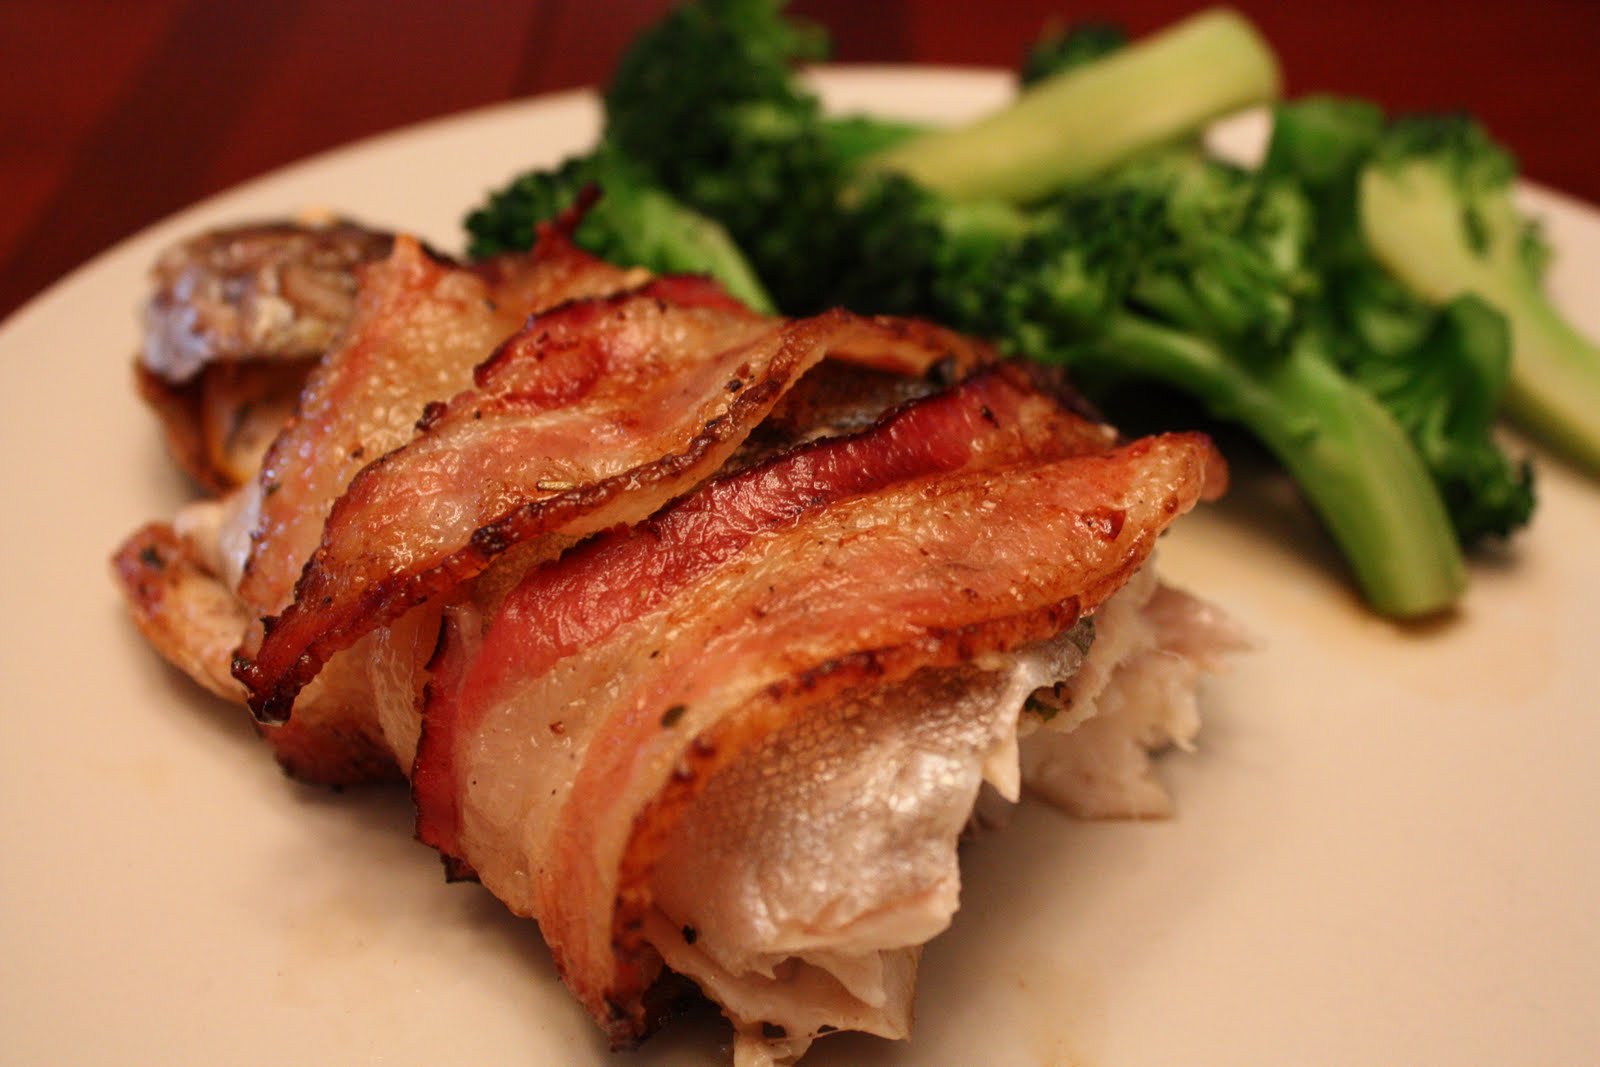
Bacon-Wrapped Trout
It may be somewhat a daunting task to cook a whole, bone-in fish, but luckily, I discovered that it was quite the opposite! No matter how you look at it, fish is easy to cook. Season it with some salt and pepper, sprinkle with lemon or lime juice and some herbs, toss it on a grill or put it in an oven, and in 10 to 15 minutes, your meal is ready. Sounds easy right?
I came across trouts one day at the supermarket since they were having a sale. I looked at this fish, right in the eyes, and debated for a few minutes if I should dare to try to cook this. I thought to myself, "It would be kind of gross to touch this fish, as it is whole and the head is still attached, but I did promise myself that we should eat more fish. We really don't eat enough fish. Wait, but that's really not my fault because I love salmon, but the husband does not. Darn, I wish we can eat salmon..." Well, I digress..., but because of this fact, I braved the thought of holding the fish in my hands and bought it for dinner that night.
After opening the package and washing the trout thoroughly with cold water, I opened up the pre-cut flap at the fish's stomach area and saw that the guts were removed (thank god). However, the spine and tiny bones were still attached. In order to make this dish more pleasant and enjoyable, so that we can eat more fish in the future (do you sense that the hubby is a picky fish-eater?? hahaa), I decided to take out the spine and bones with a small paring knife. I ended up with bruised fingers and a sore back, because this process took a bit longer than I anticipated, but the end result was nice because we did not have to be as cautious swallowing the meat during the meal.
Bacon-Wrapped Trout
Ingredients
- 2 trout, about 1 lb. per fish
- 8-10 slices of bacon (thick bacon recommended), about 4-5 slices per fish
- 1 small lemon, sliced
- 2 tsp Italian herbs mix (1 tsp per fish)
- 1 tsp dried parsley or 1 Tbsp fresh parsley (1/2 tsp dried per fish, 1/2 Tbsp fresh per fish)
- 2 tsp olive oil (1 tsp per fish), and about 1 Tbsp for the grill (or you can use Pam for the grill)
- salt
- freshly ground pepper
Tools
- grill, outdoor or over the stove top
- paring knife (optional)
- toothpicks (optional)
Steps
1. Wash the trout with cold water and pat dry. Optional: remove the spine and bones for ease of consumption. Start with the spine by using the paring knife and cutting and breaking the spine from one end of the fish. As you remove the spine, use your finger to pick at the bones connected to the spine and remove them from the meat.
2. Generously season the entire fish with salt and pepper, inside and out.
3. Season the internal fish with herbs and 1 tsp of olive oil, and place lemon slices on the inside. Ensure the lemon slices are small enough so that you can close the area. It would be difficult to wrap the fish with bacon if the lemon slices are falling out of the fish!
4. Wrap each trout with 4-5 slices of bacon. Warning: most likely, the bacon slices will not firmly stay on the fish, so you can use toothpicks to hold them in place by threading them through the bacon.
5. Pre-heat the grill and coat the grill with 1 Tbsp of olive oil, or spray with Pam. Transfer the fish to the pre-heated, pre-oiled grill. Be careful when you transfer because the bacon slices may fall off the fish.
6. Grill the trout for about 10 minutes. If you are using an outdoor grill, covered the grill for added heat. Check after 10 minutes to see if the fish is done. If not, continue to grill for a 2-3 minutes and check again.
Serves 2-4.
I came across trouts one day at the supermarket since they were having a sale. I looked at this fish, right in the eyes, and debated for a few minutes if I should dare to try to cook this. I thought to myself, "It would be kind of gross to touch this fish, as it is whole and the head is still attached, but I did promise myself that we should eat more fish. We really don't eat enough fish. Wait, but that's really not my fault because I love salmon, but the husband does not. Darn, I wish we can eat salmon..." Well, I digress..., but because of this fact, I braved the thought of holding the fish in my hands and bought it for dinner that night.
After opening the package and washing the trout thoroughly with cold water, I opened up the pre-cut flap at the fish's stomach area and saw that the guts were removed (thank god). However, the spine and tiny bones were still attached. In order to make this dish more pleasant and enjoyable, so that we can eat more fish in the future (do you sense that the hubby is a picky fish-eater?? hahaa), I decided to take out the spine and bones with a small paring knife. I ended up with bruised fingers and a sore back, because this process took a bit longer than I anticipated, but the end result was nice because we did not have to be as cautious swallowing the meat during the meal.
Bacon-Wrapped Trout
Ingredients
- 2 trout, about 1 lb. per fish
- 8-10 slices of bacon (thick bacon recommended), about 4-5 slices per fish
- 1 small lemon, sliced
- 2 tsp Italian herbs mix (1 tsp per fish)
- 1 tsp dried parsley or 1 Tbsp fresh parsley (1/2 tsp dried per fish, 1/2 Tbsp fresh per fish)
- 2 tsp olive oil (1 tsp per fish), and about 1 Tbsp for the grill (or you can use Pam for the grill)
- salt
- freshly ground pepper
Tools
- grill, outdoor or over the stove top
- paring knife (optional)
- toothpicks (optional)
Steps
1. Wash the trout with cold water and pat dry. Optional: remove the spine and bones for ease of consumption. Start with the spine by using the paring knife and cutting and breaking the spine from one end of the fish. As you remove the spine, use your finger to pick at the bones connected to the spine and remove them from the meat.
2. Generously season the entire fish with salt and pepper, inside and out.
3. Season the internal fish with herbs and 1 tsp of olive oil, and place lemon slices on the inside. Ensure the lemon slices are small enough so that you can close the area. It would be difficult to wrap the fish with bacon if the lemon slices are falling out of the fish!
4. Wrap each trout with 4-5 slices of bacon. Warning: most likely, the bacon slices will not firmly stay on the fish, so you can use toothpicks to hold them in place by threading them through the bacon.
5. Pre-heat the grill and coat the grill with 1 Tbsp of olive oil, or spray with Pam. Transfer the fish to the pre-heated, pre-oiled grill. Be careful when you transfer because the bacon slices may fall off the fish.
6. Grill the trout for about 10 minutes. If you are using an outdoor grill, covered the grill for added heat. Check after 10 minutes to see if the fish is done. If not, continue to grill for a 2-3 minutes and check again.
Serves 2-4.
Wednesday, March 31, 2010
Friday, November 6, 2009
Four Year Anniversary = Homemade Pizza
By putting up with me for 4 long years... your reward is homemade pizza. And having made homemade pizza for about 2 years now, I have to say I'm getting a little better each try!
I decided to celebrated our 4 years of togetherness (although two days later) by surprising the hubby with two of his favorite pizzas - (1) Onion & Italian Tuna and (2) Pepperoni & Mushroom. Either he is a really good hubby (nah...) or he really enjoys my pizzas (yes!), he ate 5 huge slices and wanted more! I ate 4 myself (hahaa), so I must love me a lot too.
I recommend making your pizza COMPLETELY from scratch... and yes, I mean the pizza dough too! It just makes your pizza so much more special and incredibly yummy. I've been using the same pizza dough even since I've started - Emeril Lagasse's Basic Pizza Dough.
I follow the recipe to the T and start with dissolving the yeast and sugar in warm water with the steady stirs of my spoon. After 5 minutes of waiting, you should see foaming gunk water. You should also smell the yeast (warning: not a pleasant smell).
Next comes the salt, olive oil, and half of the required flour (I put 2 cups of flour initially).
After stirring the two cups of flour in the wet mixture, your dough should be a gooey mess. I then start putting a bit of flour each time and stir, until the dough turns into a soft ball that can be transferred to the counter for kneading.
I do the required kneading (about 5-7 minutes), adding a little bit of flour each time as needed. You don't want the dough to be sticky to the touch, so flour this thing like crazy! After kneading, coat a bowl with olive oil and put this big ball of flour in it. Make sure to cover the dough with the olive oil in the bowl. Put a damp towel (I cheat and use a wet paper towel... but hey it works!) and let the dough sit for at least an hour so that it can rise. And yes... this dough will get bigger and bigger...
When ready, take out your dough and split it in two. Unfortunately (or fortunately?), this recipe always calls for 2 pizzas. Since it uses 1 package of yeast and it would be pretty hard to split the yeast, you have to make 2 pizzas each time.
Roll out the divided dough with a rolling pin. You can pick up the dough and try to stretch it or toss it at times, just like how those pizza guys on TV do it! It helps with elongating the dough than the rolling pin can do. Line your pizza pan (got this round pan at the Dollar Store, score!) with cornmeal or flour, and place the dough on the pan. It's not the prettiest thing... but I say it builds the pizza's character...
The next step is placing the toppings (my favorite part, probably because I can delegate this to the hubby), which we have pepperoni, onions, mushrooms, Italian tuna, and tomato sauce. A note on the Italian tuna: my hubby first fell in love with Onion & Tuna pizza while on vacation in Italy with his friends. I konw, it sounds a little weird and gross (really? Tuna on pizza?!!), but after taking a bite of this in Italy earlier this year, I understand why he is a true fan. Italian tuna has a very different taste than American tuna. Somehow with the combination of the onions and cheese, it brings out the sweetness and unique taste of the Italian tuna, and man, it is Oh So Good! I had actually tried to make this using American tuna a year ago (before I had the Italian version), and I thought my hubby's taste buds needed some changing (like chopping them off)... it wasn't that great. But after having it in Italy, we were determined to find Italian tuna here in the States. Although we sacrificed our wallets for this Italian tuna ($3.29 at a North Beach deli), I do believe it was well worth it.
Onion & Tuna without the second layer of cheese. This pizza is rectangular (only had one round pizza pan, so used a rectangular cookie sheet... you think I would of splurged for another dollar pan!).
Pepperoni & Mushroom with all the toppings, ready for the oven.
In the 500F oven and for about 15 minutes (make sure to put on a timer and check it when it dings!), your pizza should be ready:
It's been 3 hours and I am still stuffed. What a great way to celebrate our anniversary... :)
I decided to celebrated our 4 years of togetherness (although two days later) by surprising the hubby with two of his favorite pizzas - (1) Onion & Italian Tuna and (2) Pepperoni & Mushroom. Either he is a really good hubby (nah...) or he really enjoys my pizzas (yes!), he ate 5 huge slices and wanted more! I ate 4 myself (hahaa), so I must love me a lot too.
I recommend making your pizza COMPLETELY from scratch... and yes, I mean the pizza dough too! It just makes your pizza so much more special and incredibly yummy. I've been using the same pizza dough even since I've started - Emeril Lagasse's Basic Pizza Dough.
I follow the recipe to the T and start with dissolving the yeast and sugar in warm water with the steady stirs of my spoon. After 5 minutes of waiting, you should see foaming gunk water. You should also smell the yeast (warning: not a pleasant smell).
Next comes the salt, olive oil, and half of the required flour (I put 2 cups of flour initially).
After stirring the two cups of flour in the wet mixture, your dough should be a gooey mess. I then start putting a bit of flour each time and stir, until the dough turns into a soft ball that can be transferred to the counter for kneading.
I do the required kneading (about 5-7 minutes), adding a little bit of flour each time as needed. You don't want the dough to be sticky to the touch, so flour this thing like crazy! After kneading, coat a bowl with olive oil and put this big ball of flour in it. Make sure to cover the dough with the olive oil in the bowl. Put a damp towel (I cheat and use a wet paper towel... but hey it works!) and let the dough sit for at least an hour so that it can rise. And yes... this dough will get bigger and bigger...
When ready, take out your dough and split it in two. Unfortunately (or fortunately?), this recipe always calls for 2 pizzas. Since it uses 1 package of yeast and it would be pretty hard to split the yeast, you have to make 2 pizzas each time.
Roll out the divided dough with a rolling pin. You can pick up the dough and try to stretch it or toss it at times, just like how those pizza guys on TV do it! It helps with elongating the dough than the rolling pin can do. Line your pizza pan (got this round pan at the Dollar Store, score!) with cornmeal or flour, and place the dough on the pan. It's not the prettiest thing... but I say it builds the pizza's character...
The next step is placing the toppings (my favorite part, probably because I can delegate this to the hubby), which we have pepperoni, onions, mushrooms, Italian tuna, and tomato sauce. A note on the Italian tuna: my hubby first fell in love with Onion & Tuna pizza while on vacation in Italy with his friends. I konw, it sounds a little weird and gross (really? Tuna on pizza?!!), but after taking a bite of this in Italy earlier this year, I understand why he is a true fan. Italian tuna has a very different taste than American tuna. Somehow with the combination of the onions and cheese, it brings out the sweetness and unique taste of the Italian tuna, and man, it is Oh So Good! I had actually tried to make this using American tuna a year ago (before I had the Italian version), and I thought my hubby's taste buds needed some changing (like chopping them off)... it wasn't that great. But after having it in Italy, we were determined to find Italian tuna here in the States. Although we sacrificed our wallets for this Italian tuna ($3.29 at a North Beach deli), I do believe it was well worth it.
Onion & Tuna without the second layer of cheese. This pizza is rectangular (only had one round pizza pan, so used a rectangular cookie sheet... you think I would of splurged for another dollar pan!).
Pepperoni & Mushroom with all the toppings, ready for the oven.
In the 500F oven and for about 15 minutes (make sure to put on a timer and check it when it dings!), your pizza should be ready:
It's been 3 hours and I am still stuffed. What a great way to celebrate our anniversary... :)
Thursday, August 21, 2008
Fish Stew One Night, Beef Stroganoff The Next
I try to make dinner every week night so that we don't waste money eating out all the time, although the thought of it is very tempting because I always have to endure a looooong commute home. Bleh :(
Monday night I made Fish Stew (from Simply Recipes again)
Elise says that the most important ingredient to the Fish Stew is clam juice... and when I read it, I was like, ehh, really?! Finding it at the supermaket was adventurous, and after circling the place twice, we finally asked someone. I thought it was a refrigerated item next to the fish counter, but it turned out to be with the tuna cans. OK, cool. When I opened it, I thought I was going to make my kitchen reek of clam juice, but there was practically no smell to it. I wasn't brave enough to try it on it's own though.
I also replaced parsley with cilantro because, for some weird reason, I couldn't find parsley at the Farmer's Market.
I used pinot grigio for the white wine. That was yummy... in the soup and to drink on the side (while cooking, hehe!)
For the fish, I used 7 pieces of dove sole fish. I'm not sure if it's because I left it in the freezer too long or this fish just smells, but the fish smelled. I would probably choose to use another white fish next time. I'm glad the ingredients in the soup covered up the fish stank.

I did exactly what the recipe asked for - cook the onions, garlic, and cilantro. Add clam juice, wine, then fish. So far so good!
I covered the pot and let it cook and boil for about 8 minutes.
Our dinner - fish stew, romaine lettus with kidney beans, cheese, and italian dressing, and drank the rest of the pinot grigio!
Tuesday night I made Beef Stroganoff (also from Simply Recipes - love it!)

The first thing I realized is that this recipe asks for A LOT of butter (6 TBSP total), so always changing things on my own, I decided to use OO and just a little chunk of butter. Gotta add the butter for taste!
After cooking the meat in the OO and butter, use the pan drippings to cook the onions. Smells so good!
A few more ingredients waiting to go into the pot.
After the onions were sauteed, take it out of the pot and add it to the plate of beef, and add the mushrooms to the hot pot. The recipe asked for another 3 TBSP of butter, but I just added OO this time. Trying to cut down some fat! I sprinkled nutmeg and basil (substituted for tarrgon) to the cooking mushrooms. You can instantly smell the spices goodness.
I then turned the heat to low, and added the sour cream. I put the meat and onions back in the pot. At first when I tasted this concoction, I was like, ehhh, so sour. So I added salt... still sour... more salt... somewhat sour... more salt... then yum! I realized salt is very important to make this sauce taste right.
I couldn't wait to eat it! I've only had beef stroganoff as frozen dinners (sad eh?) so I was anxious to make a good fresh one! I used linguini and boiled some broccoli and green beans.
The husband and I loved it!
Monday night I made Fish Stew (from Simply Recipes again)
I also replaced parsley with cilantro because, for some weird reason, I couldn't find parsley at the Farmer's Market.
I used pinot grigio for the white wine. That was yummy... in the soup and to drink on the side (while cooking, hehe!)
For the fish, I used 7 pieces of dove sole fish. I'm not sure if it's because I left it in the freezer too long or this fish just smells, but the fish smelled. I would probably choose to use another white fish next time. I'm glad the ingredients in the soup covered up the fish stank.
I did exactly what the recipe asked for - cook the onions, garlic, and cilantro. Add clam juice, wine, then fish. So far so good!
I covered the pot and let it cook and boil for about 8 minutes.
Our dinner - fish stew, romaine lettus with kidney beans, cheese, and italian dressing, and drank the rest of the pinot grigio!
Tuesday night I made Beef Stroganoff (also from Simply Recipes - love it!)
The first thing I realized is that this recipe asks for A LOT of butter (6 TBSP total), so always changing things on my own, I decided to use OO and just a little chunk of butter. Gotta add the butter for taste!
After cooking the meat in the OO and butter, use the pan drippings to cook the onions. Smells so good!
After the onions were sauteed, take it out of the pot and add it to the plate of beef, and add the mushrooms to the hot pot. The recipe asked for another 3 TBSP of butter, but I just added OO this time. Trying to cut down some fat! I sprinkled nutmeg and basil (substituted for tarrgon) to the cooking mushrooms. You can instantly smell the spices goodness.
I then turned the heat to low, and added the sour cream. I put the meat and onions back in the pot. At first when I tasted this concoction, I was like, ehhh, so sour. So I added salt... still sour... more salt... somewhat sour... more salt... then yum! I realized salt is very important to make this sauce taste right.
The husband and I loved it!
Subscribe to:
Posts (Atom)