Monday, October 31, 2011

BOO! It's Halloween!

Ahh... Halloween.  The time for kids to go on an endless sugar high, for parents to drag their kids around at night, and for those in-between to assume another identity and let their "other" personalities come out!  I've always enjoyed Halloween and this year is no different.

My department is holding a Halloween party this year and I'm pretty darn excited because of all the activities!  There will be three contests for everyone - costume contest, pumpkin carving contest, and a cupcake contest!  I immediately signed up for the cupcake contest and later signed up for the pumpkin carving contest after my coworker convinced me.  Good thing she did because I had a lot of fun carving different jack 'o lanterns on the pumpkin.  Three hours of hard and laborious work, but it was well worth it...

As you know, I've been trying hard to become a better baker, so this cupcake contest provided more of a motivation to do well (competitive much?).  In the days leading up to it, I have been researching cupcake flavors, frosting ideas, and Halloween-themed designs.  I also knew I had to do a test batch to make sure it will turn out edible and presentable because I did not want to start on the Sunday before and end up with disastrous results and no cupcakes to offer the next day.  The practice run was a great idea because for the second time around, I knew exactly what I was doing and the cupcakes turned out refreshingly moist and delicious!  The cream cheese frosting was just sweet enough and paired well with the pumpkin-flavor cake, and the finely chopped chocolate chips were a wonderful final touch to the cupcakes.  I hope the judges will like it.  Wish me luck everyone!

Happy Halloween!!

Pumpkin Cupcakes with Maple Cream Cheese Frosting

Pumpkin cupcakes from Ina Garden for HouseBeautiful
...I doubled the recipe to make bigger and plumper cupcakes.  It yielded 20 cupcakes.

Gently fold the flour mixture in the wet mixture until just combined.  The final batter should be thick and lumpy.

Use a cookie scooper to fill the pan, and use the back of the scooper to "round out" the batter so that you can get a good-lookin' cupcake!

Maple Cream Cheese Frosting adapted from Ina Garden for HouseBeautiful
Ingredients
- 9 oz cream cheese, room temperature
- 3 Tbsp unsalted butter, room temperature
- 1 1/2 cup powdered sugar
- 1 tsp vanilla extract
- 2 Tbsp maple syrup

Decoration:
- 1 cup semi-sweet chocolate chips, finely chopped
- 18 ghost marshmallow peeps

Tools
- electric mixer
- food processor

Steps
1. Cream the cream cheese and butter on low until softened.

2. Pour in maple syrup and vanilla extract.  Slowly stir in powdered sugar until softened.

3. Chop the chocolate chips in the food processor until fine.  Lay chocolate on a plate for dipping.

4. Take the ghost marshmallow peeps and cut about 1/4 to 1/3 inch of marshmallow from the bottom of the ghost.

5. Frost your cupcakes!  Once frosted, turn the cupcake upside down and dip the frosted cupcake in the chocolate.  Make sure the chocolate is abundant across the surface area of the cupcake (for mimicking dirt) and place a ghost peep on top of the cupcake.  If the ghost peep is not stable, spread a little bit of frosting on the bottom to ensure it stays on top of cupcake.  

The ghost peeps say, "BOO! I dare you to eat me!"

Tuesday, October 25, 2011

Chocolate Cupcakes - Moist and Delicious

I am working really hard to become a mediocre baker.  I am not even aiming for to be a great baker, because that is reaching far beyond the stars, but just one that can pass by from time to time.  Not exaggerating, but 8 out of 10 times, I would fail at baking something.  The end product would be too hard, too watery, or just too disgusting to eat.  I would stare at the pile of baked goods sitting in my trash can with sadness and wonder where did it all go wrong?! 

Lately, I have been failing more than succeeding.  I recall about a month ago, I was trying out a new muffin recipe, after making multiple delicious batches of other types of muffins, and I failed horribly.  Giving this some thought, I came to the conclusion that I am too ambitious about baking.  For savory dishes, I would typically look at the ingredients and how long it would take to make it.  If everything works out, then I would attempt to make the dish.  I took the same approach with baking.  Most of the ingredients are easy to find - flour, baking soda, baking powder, milk, oil, etc. - and it only takes a few minutes to incorporate everything together.  But what I forget are the skills and techniques that go into every batter.  Beat, stir, fold... I may think I know what they mean, but I most likely do not perform them correctly!  My goal now is to start small, tiny baby steps, with baking.  No more ambitious recipes or complicated techniques.  I hope my husband has the appetite because more are coming!

Moist Chocolate Cupcakes
from Simply Recipes

The results?

Chocolate cupcake: easy to make, moist and delicious, just as promised.  I opted to cut out some sugar, from 1 cup to 3/4 cup.

Chocolate frosting: major FAIL.  I think where I went wrong was that I wanted to cut the recipe in half, and I did that with everything, except for the cocoa (old brain, forgot).  It ended up making the mixture really thick, which I tried to compensate by adding the other half of the butter and putting it back on the stove for melting, and this became a downward slope towards frosting failure.  Another strike added to my record.  Instead, I sprinkled powder sugar and placed a piece of strawberry on top.  It's healthier, right?


Sunday, October 23, 2011

Barbeque Pork, Chinese Style

Char Siu, which literally means "fork roast", is a staple item throughout the world of Asian food.  This bad boy chunk of meat can be placed on top of anything, from white rice to noodle soups and porridge, and in buns such as "char siu bao", a popular dimsum item, or sandwiched in between bread.  When Bubba from Forest Gump started naming out all the different types of shrimp, "There's shrimp kabobs, shrimp creole, shrimp gumbo, pan fried, deep fried, stir fried.  There's pineapple shrimp and lemon shrimp, coconut shrimp...", this is exactly what char siu is like for Chinese cuisine.  You can put char siu on everything and pair it with anything!  It is also quite delicious all by itself.

Char Siu (Chinese Barbeque Pork)

Ingredients
- 1 lb pork shoulder (aka pork butt)
- 4 Tbsp Char Siu sauce
I use this brand:


- 3 cloves of garlic, finely minced
- 2 tsp black pepper
- 1 tsp sugar

Steps
1. Marinate the pork shoulder with char siu sauce, garlic, and black pepper overnight.  At first the sauce is very sticky and hard to manage, but check on the pork a few hours later and the sauce becomes more watery.  At this point, ensure all of the pork gets covered in the garlic char siu marinade.

2. Preheat the oven at 375 degrees.  Take out the marinated pork and let it sit at room temperature while the oven heats.  Place pork in oven for 20-25 minutes.  In the last 5 minutes, spread 1 tsp of sugar on top of pork pieces and place it back in the oven until done.

3. Once the pork is done, let it sit on the counter for 15 minutes.  Thinly slice pork and serve.

Serves 3-4.


A few tips...
...if you desire the "barbeque-crisp-burning" type of barbeque pork, then about 10 minutes before the pork is finished, take out the pork and place it on a hot grill (medium heat) until done.
...pork shoulder is the best piece of meat for this, so don't substitute!  The shoulder contains fat sections that gives the barbeque meat its flavor while cooking.
...this barbeque pork will go well with a previous post of mine: Vietnamese BBQ Pork Vermicelli.  It also went well with a lunch meal I made for my nephew recently, BBQ Pork and Dry Tossed Egg Noodles (adapted from 3 Hungry Tummies.  To note: I only used the noodles dressing recipe and substituted caramel sauce with Hoisin sauce).

sweet and savory pork, tangy eggy noodles, and refreshing stir-fry cabbage with shiitake mushrooms

Thursday, October 20, 2011

Fajita Fiesta

Sundays are usually the one day in the week that I am motivated to cook something new.  I spend the entire day looking through food blogs and recipe websites to get inspiration.  I usually have a set of ingredients in mind that I want to use or know I have and I start searching for that perfect recipe.  Although I may be doing this the wrong way (people usually decide what to make and then go out and buy the ingredients, right?), it has worked over and over again. 
This past Sunday's inspiration was steak fajitas.  My husband and I quickly scarfed down two fajitas during dinner, and we finished up the rest for lunch the next day.  That's success. 

Steak Fajitas
from Simply Recipes

Serves 4.

substituted flour tortilla with corn tortilla.  delicious!
also, the ceramic dish was an exciting purchase from Puerto Vallarta!

homemade guac and salsa :))

all wrapped up, yum!


Tuesday, October 18, 2011

Cheese Twists and Airplanes

San Francisco Fleet Week occurred a couple of weeks ago and we ventured up to the city to catch a glimpse of the Blue Angels and other amazing performances.  A glimpse of the Blue Angels is all we received, because right before they were set to perform, massive thick fog came rolling in over the Golden Gate Bridge and we had a feeling that the show was going to be cancelled.  Although disappointment washed over us as we heard the announcer confirm our suspicion, we still enjoyed a nice time on the small beach at Crissy Fields, looking up at the blue and clear sky for different aircrafts, and enjoying store-bought and homemade picnic items.  These puffy pastry cheese twists did the trick!

Puff Pastry Cheese Twists
from the Food Network 

A few tips...
...do not spread too much of the oil mixture on the puff pastry as it will spill out as you twist.  Make sure to roughly cover all of the pastry, but, don't overdo it!
...I used Mexican cheese (all I had in the fridge) instead of Parmesan... still delicious!
...the baking time in the recipe was too short for my oven (the twists were not golden brown) so I left it in the oven at 3-minute increments.  Make sure to watch it so that it doesn't burn.

Wednesday, October 5, 2011

Happy Birthday with Crock Pot Chicken Pho

Happy Birthday S!  It's my younger sister's birthday today, another year to add to her late twenties.  Ever since I can remember, my family holds a strong tradition for birthdays and eating noodles.  For a long, long life of the birthday family member, we must congregate and eat noodles the day (or a few) before a birthday.  It's a big "no no" if the noodles are eaten the day of or after a birthday!.  As an avid noodle-lover such as myself, I have no complaints about this particular family tradition.

There are also other rules to the tradition, such as while eating the noodles, one must not chew off and break the noodle strand in order to ensure a long and wonderful life.  Or if a family member is elsewhere and cannot join the noodles dinner, then that member must try their very best to eat noodles on the same day.  Over the years, the tradition of birthday noodles also turned into a strict set of menu.  The birthday member typically has a choice of 3 different types of noodles: Za Zang Mien, Lian Mien aka Cold Noodles (if you have a birthday in the summertime), and Beef Noodle Soup, as explained here.

However for this birthday, I volunteered (or was I commanded by S?!) to make birthday noodles for the entire family.  I wanted to change things up and Chicken Pho instantly came to mind.  To be honest, this is really just another excuse to use my handy-dandy crock pot.  I put all the ingredients together and turned on the crock pot to high on an early Sunday afternoon, and by that evening, my kitchen was filled with the distinct smell of pho, which was all worth the wait.

Slow-Cooked Chicken Pho with BBQ Chicken
Chicken Pho from Jaden Hair of SteamyKitchen for Bon Appetit

Optional Ingredients:
- 2 stalks green onions, finely chopped
- Hoisin sauce
- Sriracha hot sauce

A few tips...
...I used parts from a whole chicken - chicken wings, gizzards (except for liver), and the entire chicken body after separating the breasts, legs, and excess skin.  Since you are just cooking the broth, save the good parts for something else and use as much as the miscellaneous parts as you can.  I used the chicken breasts for the BBQ Chicken portion of this recipe.
...I did not use whole coriander seeds because after I had put all the ingredients in the crock pot, I realized I did not have this ingredient.  I made beef pho before so I thought I had all the spices, but apparently, chicken pho is a little different.  Even without the coriander seeds, it still turned out tasty.
...for my crock pot size and amount of water, it took 5 1/2 hours to cook the broth.  The longer, the better.
...remember to salt your broth when it's close to done.  The recipe doesn't include any salt but to have a tasty bowl of pho, use salt!

BBQ Chicken adapted from Vietnamese BBQ Pork Salad, Savory Sweet Life

Ingredients
- 2 chicken breasts
- 1 Tbsp soy sauce
- 1/4 cup fresh lime juice
- 2 Tbsp fish sauce
- 1/4 cup water
- 2 Tbsp of olive oil
- 2/3 cup sugar
- salt and pepper to taste
- 1/2 onion, roughly chopped

Steps
1. Combine ingredients except for chicken and onions in a bowl.  Put bowl in microwave and ensure all the sugar melts.

2. Place chicken and onions bowl and marinate for at least 1 hour.

3. Grill chicken breasts over medium heat and cook until done.  Let chicken sit for about 5 minutes and cut into slices.

When the broth and BBQ chicken are done, assemble pho with soup, noodles, BBQ chicken slices, bean sprouts, sliced onions, green onions, and cilantro.  Pair with hoisin sauce and Sriracha hot sauce.

Serves 4-6.

Monday, October 3, 2011

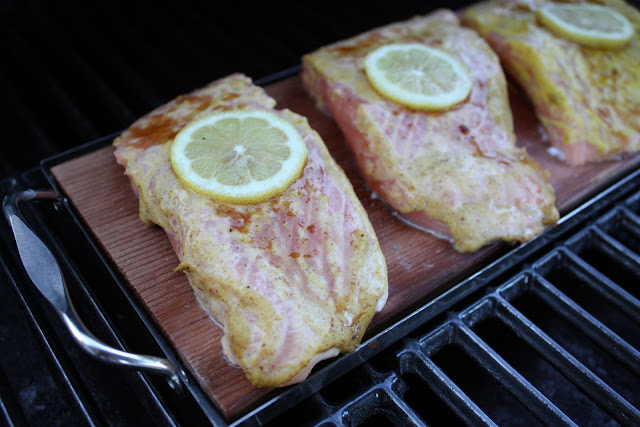
Holding On To Summer... Grilled Cedar Plank Salmon

I don't want the nice summery weather to end!  I may be speaking for everyone that we are truly enjoying the breezy and nice 75 to 85 degrees weather of late, so nice summer weather, just stay, OK?

During a recent staycation to Monterey, I stopped by Sur La Table and picked up some new toys.  I blame this shopping spree on the $10 coupon that Sur La Table mailed to me a few weeks ago, indicating that I can get anything and receive a nice $10 off discount!  How could I resist?  I bought a cedar plank, a plank tray, and a $2 zester after rummaging through the clearance pile.  Total damage? 6 dollars!  I have been longing to own wood planks for cooking fish, ever since we bought our grill a few years ago.  It brings great flavor to the fish, and honestly, I think it just looks cool while cooking.  This cedar plank salmon did not disappoint!

Cedar Plank Salmon
From BBQ with Bobby Flay, Food Network

Tools
- Cedar plank (carefully read preparation and after cooking instructions to ensure longevity of the wood)
- Plank tray (optional. I thought it was a good idea to get one so that I will not have to replace the plank too often.  Besides, it was $10, so technically it was free. ^_^)

paired with fresh grilled pineapples (juicy, sweet, and a great complement to the salmon)

and also paired with my lazy salad (delegated the salad to my younger sister to make!)

Sunday, October 2, 2011

A Daring Adventure: Radish Kimchi

The thought of attempting to make kimchi had never crossed my mind... until 5 days ago.  My older sister L invited us over this past Saturday for a Korean meal filled with BBQ short ribs, various side dishes (which I've learned is called "banchan") such as napa cabbage kimchi, cucumbers, seaweed salad, black beans, jap chae (stir-fry glass noodles), along with dried seaweed and rice.  I wanted to bring something special over and contemplated what to bring to a Korean meal.  I really love kimchi made from radishes, more so than the "traditional" kind made from napa cabbage.  After a quick search on the web, kimchi seemed easy to make.  I called sis L quickly to see what she thought, and luckily, she provided encouragement for me to go on this fermenting adventure.

The result?  A successful first try! (PHEW)

Radish Kimchi
From Honey and Butter

A few tips...
...very important: buy the correct radish!  Korean radish are stumpy fat-looking radishes, pretty cheap at Korean supermarkets (I got mine at 39 cents/lb).  My sister L has a friend who makes kimchi and that was the only thing her friend warned her about.  Be brave and ask one of the Korean ladies that works at the supermarket - they will steer you in the right direction.

 dice into bite-size pieces.  time-consuming?  yes.  but it will pay off in the end!

....I bought 2 stumpy radishes and it turned out to weigh about 2 3/4 lbs.  From the recipe, I estimated that I had about 1/3 of the radishes that the recipe called for, so I divided all the ingredients into thirds.
...if the mixture is not spicy enough for you, add more red pepper powder!  Don't be afraid!

the stuff!

...the recipe calls for fermenting on the kitchen counter for 12-24 hours, but I felt that it needed more time than that.  I had a taste after 24 hours and it wasn't "kimchi" enough, so I left it out for another day.  After 48 hours?  Yum!
...use tight lid jars.  It's key.  This will help with the fermenting process, and as the recipe calls for, intense workout-like shaking to mix the radishes with "the stuff".  I was sweating after a minute of shaking.

shake shake shake!  it's ready to ferment now.

banchan