Thursday, April 15, 2010

Just Pictures: Kushiyaki Goodies

Yaki Onigiri (grilled rice ball)

Non-Grilled Items:
Fresh Chicken Spring Rolls
Sumika Salad
Tsukune-Don (ground chicken & egg over rice)
Sumika // Los Altos, CA
(photos courtesy of EH)

Tuesday, April 13, 2010

Green Curry, Thai Style

One of my favorite items to order at a Thai restaurant is the curry.  No matter if it's red, yellow, or green, Thai-style curry, which is basically curry with the addition of coconut milk, is delicious when poured over a bed of white rice.  The curry paste is easy to buy, and is available at all Asian supermarkets.  No longer do you have to frequent a Thai restaurant for the curry, you can make it yourself at home!  Give it a try!


Thai Green Curry with Pork

Ingredients
- 2 boneless pork chop pieces, cut into cubes
- 2 Tbsp green curry paste
- 1 Tbsp cooking oil
- 1 can of 13.5 oz coconut milk (shake well before using)
- 1 1/2 Tbsp fish sauce
- 1 1/2 tsp sugar
- 1/2 yellow onion, quartered
- 1 large red pepper, cut into cubes
- 1 large zucchini, cut into cubes
- 1/3 cup frozen peas

The important ingredients for this dish...
Tools
- iron cast pot

Steps
1. Saute the green curry paste in oil over medium heat in a crock pot until fragrant.  Reduce the heat and gradually add 1/2 can of the coconut milk a little at a time.  Stir frequently until a film of green oil surfaces.

2.  Add the pork and continue cooking until pork is halfway cooked through.  Add the remaining coconut milk and season with sugar and fish sauce.
3. When the mixture returns to a boil, add the chopped onions and red peppers.
4.  Cook the vegetables for 10 minutes and add the chopped zucchini and frozen peas.  Cook until the all the vegetables are done, about another 5 minutes.

Serves 4.

A few tips...
...add any kind of "stewing" type of vegetables as desired, such as other type of peppers (green, orange, yellow, etc.) or potatoes (since potatoes take longer to cook, chop into cubes and you can either (1) cook the potatoes separately in hot water for 10 minutes prior to adding it in with the vegetables, or (2) cook in the curry mixture for about 10 minutes prior to adding the remaining vegetables)
...to make your dish prettier, garnish with sweet basil leaves and red chilies before serving.
...the original recipe asked for 2 torn kaffir lime leaves, but I didn't have that available so I didn't add it in.  The curry still turned out good!
...if there are leftovers, I want to warn that the more times you heat it, the spicier it will get!  Don't say I didn't warn you!

Thursday, April 8, 2010

Pulled Pork Burrito

On a meat-shopping trip one day to the local supermarket, I saw pork shoulder pieces on sale so I grabbed it.  I was being purely spontaneous, since I had absolutely no idea what I was going to do with it.  A light shed upon me as I came across a pulled pork sandwich recipe on my favorite food blog.  Making pulled pork seemed like a long and complicated process (shows always feature restaurants that would grill and boil and cook big hunk of pork meat and it would take hours and hours), but as I read through the ingredients and method, it seemed pretty simple!  I was amazed.  I just had to make it.


Pulled Pork Burrito
adapted from Pulled Pork Sandwich, Simply Recipes

Ingredients
Sauce:
- 1/2 onion, chopped
- 3 garlic cloves, peeled
- 1 chipotle chili pepper in adobo sauce (plus a little bit of adobo sauce)
- 1 Tbsp Dijon mustard
- 1/2 cup distilled white vinegar
- 1/2 tsp chili powder
- 1/4 cup ketchup
- 1 tsp Worcestershire sauce
- 4 Tbsp light brown sugar

- 1 1/2 pounds of pork shoulder
- 1 bay leaf
- 2 cups of water
- Salt
- 4 flour tortilla
- 1 heirloom tomato, diced
- 2 lettuce leaves, thinly sliced
- optional: shredded cheese, Spanish rice, beans, onions

Tools
- food processor or blender
- large pot or iron cast pot

Steps
1. Purée all of the sauce ingredients in a food processor or blender until smooth. If you have extra time, marinate the pork in the sauce overnight or for several hours before cooking.
2. Put sauce, bay leaf, and pork into a large pot (or crock pot) and add 2 cups of water. Bring mixture to a boil and simmer, covered, turning frequently, for 1.5 hours or until the meat pulls apart easily with a fork.
3. Remove the pork from the pot.  When cool, shred pork into small pieces. Set aside.

4. When the pork is cooling, reduce the sauce by two-thirds. Add the pork back to the sauce. Salt to taste. Remove bay leaf before serving.

5. Heat the flour tortilla by placing it in a hot pan for 1-2 minutes.  Assemble the burrito with pork, diced tomatoes, and lettuce (add additional topping as desired). 

Serves 2.

Monday, April 5, 2010

Spicy Orange Chicken (No, Not Panda Express-like!)

Whenever I see the words "orange chicken" I imagine these bright orange-looking chicken pieces sitting in a heavy sweet sauce at the Panda Express in the nearby mall.  I know I don't make it sound appetizing, but I actually like it.  Who doesn't like chicken-like meat deep fried and smothered in a sweet tangy sauce?  And on top of a big mountain of greasy chow mien?  Yum!  It's the ultimate fast food!

Last night I made these spicy orange chicken thighs as to keep up with the orange-themed recipes.  I still have so many oranges left, even though many have been shared already.  Maybe I need to stop picking them... but it's oh so fun :P.  I didn't have many expectations as to what they would taste (I just hoped it would be edible), but it was surprisingly delicious!  The must-have ingredient of this dish is the chipotle chili peppers in adobo sauce (do not substitute or skip it!).  I actually googled this ingredient because I had no idea what I should be looking for in the market.  Working with new ingredients is adventurous and fun at the same time.  The chicken was filled with sweet yet spicy flavors of the peppers and it worked well with the oranges.  I paired the meal with a fresh spinach salad of strawberries, pieces of pomelo (yes, individually handpicked by moi, hard work man!), and chopped pimento olives mixed with store-bought red wine vinaigrette dressing.


Spicy Orange Chicken
adapted from Orange Marinated Chicken, Simply Recipes

Ingredients
- 2 pounds chicken thighs or drums, skin on
- 3 oranges, peeled and seeded, coarsely chopped (or 1-1 1/2 cups fresh squeezed orange juice)
- 1/4 onion, chopped
- 2 whole chipotle chili peppers (in adobo sauce)
- 2 small cloves garlic, coarsely chopped
- about 1/4 cup chopped fresh cilantro
- 2 tsp fresh rosemary leaves, chopped (or 1/2 tsp dried)
- 2 tsp fresh thyme leaves (or 1 tsp dried)
- 2 tsp fresh marjoram leaves (or oregano, or 1/2 tsp dried of either)
- 1 tsp salt
- 1 Tbsp butter, melted

Tools
- food processor or blender
- gallon-size freezer bag or large container with lid

Steps
1. In a food processor or blender, combine the chopped oranges, onion, chipotle in adobo, garlic, cilantro, rosemary, thyme, marjoram, and salt. Pulse a few times to make a coarse purée.
2. Combine chicken thighs and the orange marinade together either in a ziplock freezer bag or container. Refrigerate for a few hours (or overnight).

3. Preheat oven to 425°F.  Remove marinated chicken thighs and wipe off excess (but not all) and place in a baking pan.  Melt butter and pour butter over chicken pieces.
4. Bake for a total of 50-55 minutes, until the skins are crispy brown, and the chicken is cooked through, juices running clear (thighs have an internal temperature of 175°F).  Let rest, covered in foil, for 10 minutes before serving.

Serves 2-3.

Sunday, April 4, 2010

Orange Muffins With Raisins

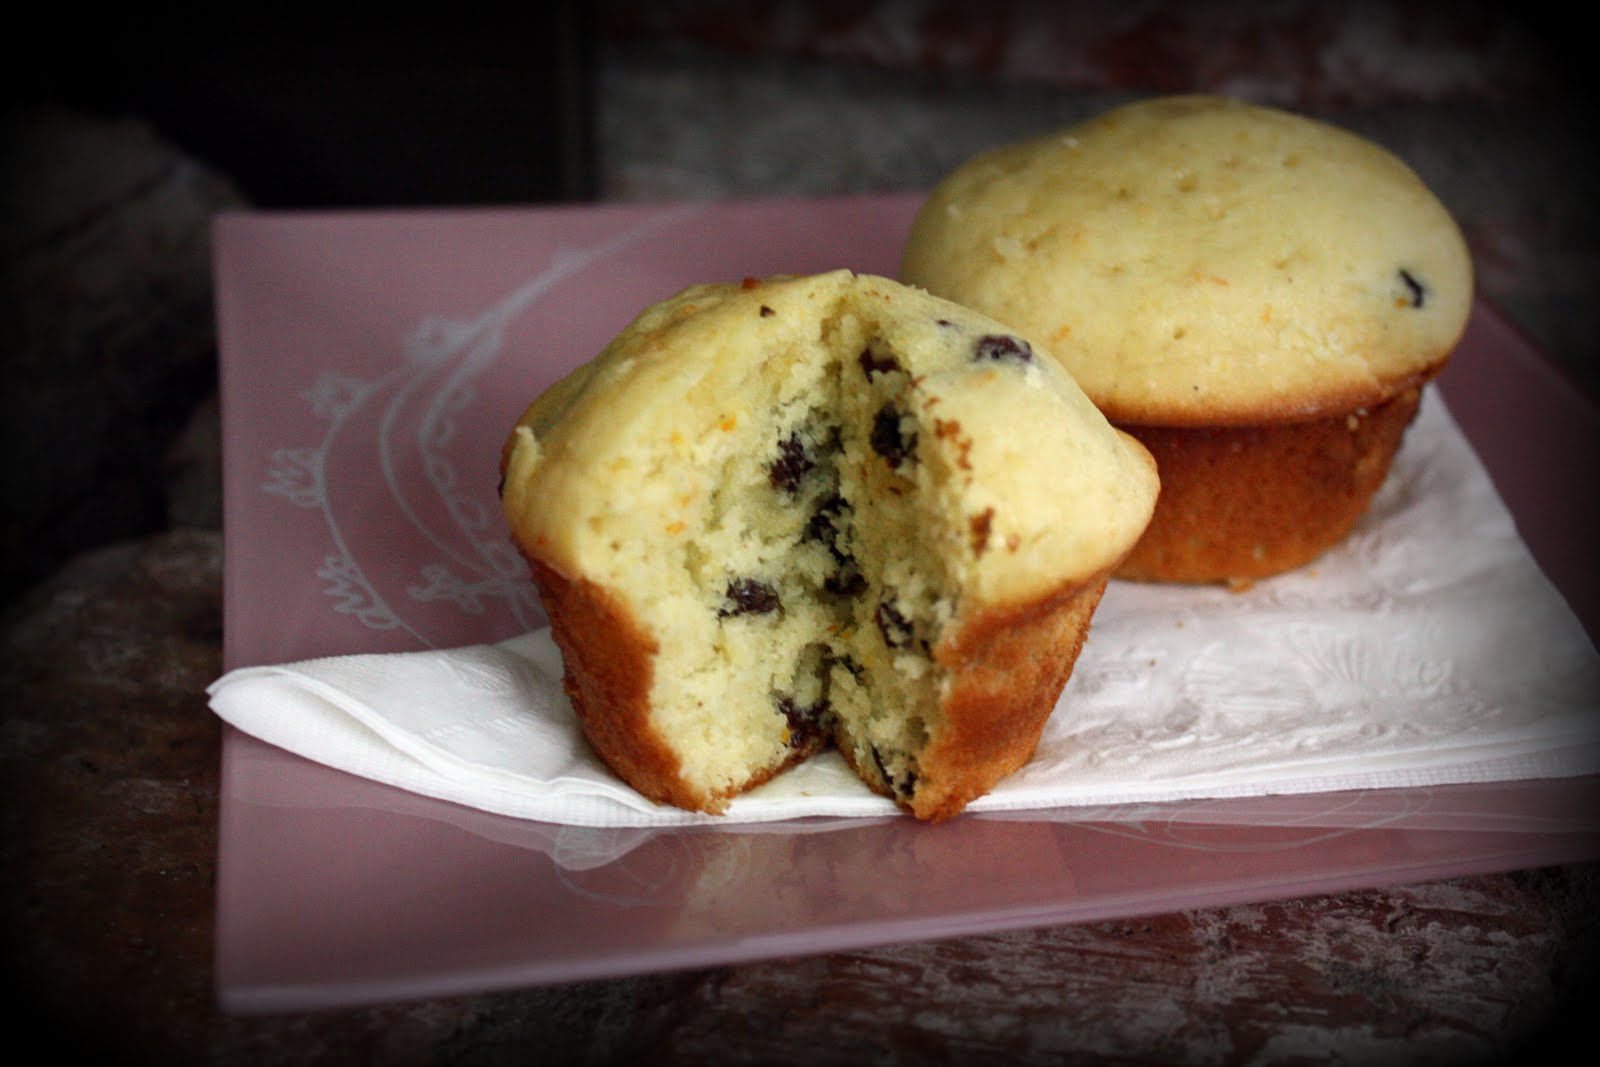
A promise kept... an orange-related recipe is here!  A few weeks ago I made my first muffins (pumpkin maple muffins from http://www.pinchmysalt.com/, delish pumpkin and spiced muffins with the perfect hint of maple syrup, yummm), so I wanted to give muffins a try again.  These make great quick breakfast-to-go or snacks, and easy for the hubby to bring to work and share so we're not overwhelmed from my baking desires.  From start to finish, sweet orange aroma filled my nose and kitchen.  The orange muffins were soft and moist, slightly sweetened by the raisins - how perfect!  Thanks to a rainy and cold day, I truly enjoyed this baking adventure today!


Orange Muffins with Raisins
adapted from Orange Bread, Simply Recipes

Ingredients
- 1/3 cup butter, softened (plus 1 Tbsp for buttering the muffin pan)
- 3/4 cup sugar
- 2 eggs
- 1 Tbsp orange zest (or more for more intense orange flavor)
- 2 cups all-purpose flour, sifted
- 1 tsp baking soda
- 1 tsp baking powder
- 1/4 tsp salt
- 1/4 tsp cinnamon
- 1 cup plain yogurt (whole, lowfat, or nonfat is fine, just make sure it's plain!)
- 1/2 cup raisins, chopped
Optional glaze
- 1 tsp lemon juice
- 1 tsp orange juice
- 1/3 cup powdered sugar (confectioner's sugar)
 
Tools
- electric mixer or handheld mixer
- mixing bowl
- sifter 
- zester 
- pastry brush
 
Steps
1. Preheat oven to 350°F. Melt 1 Tbsp of butter and butter a 12 cups muffin pan with a pastry brush.

2. Beat the butter until fluffy, about 2 minutes on high in an electric mixer. Add the sugar and beat for an additional 2 minutes. Add the eggs, one at a time, beating until completely incorporated after each addition. Beat in the orange zest.
3. In a separate bowl, whisk together the flour, baking soda, baking powder, salt and cinnamon.

4. Add the yogurt and dry ingredients by thirds, starting with the yogurt, alternating the additions. Beat only until just incorporated. Mix in the raisins.
5. Immediately pour batter into prepared muffin pan. Place in middle rack of 350°F oven. Bake for 20-25 minutes, until a toothpick inserted into the center comes out clean.

 6. Cool on a rack in the pan for 5 minutes. Then remove the muffins from the pan and cool for another 10 to 15 minutes.
7. While muffins are cooling, prepare optional glaze if desired. Whisk together the lemon juice, orange juice, and powdered sugar until smooth and there are no lumps. Use a toothpick or skinny skewer to poke holes in the top of the muffins. Place the muffins on a plate and drizzle the glaze over the each muffin.

Makes ~12 muffins (if you don't fill the batter to the very top of the pan).

A few tips...
...from many sad failed attempts at baking, I discovered that baking is very precise.  So if you are typically a "a little dash here, a lot over there" cook like I am, do not do this with baking!  Be precise!  Wash the dust off your measuring cups and spoons!
...you can substitute regular raisins with golden raisins, and add walnuts or pecans if desired (remember to chop the nuts for ease of eating).
...if you are not sure how long to bake them, I would recommend to set your timer to the shorter time (eg. 20 minutes in this case) and check when it's time.  If it's not ready, add a few more minutes and check again until ready.
...to take out the muffins from the pan, use a butterknife and carefully cut around the muffin and carefully pull it out of the pan.  If you want to avoid this tedious task, line the pan with cupcake wrappers for easy removal.
...if you want to make a loaf instead (this is actually the original recipe), bake for 45-50 minutes in a 4x8 loaf pan, or 40 minutes in a 5x9 loaf pan.

Saturday, April 3, 2010

Lemon Chicken

Trying to get my groove back like Stella (feels like its been ages since I posted a homecooked meal), here is a simple chicken recipe consisting of lemons and herbs taken from my go-to food blog Simply Recipes.


Lemon Chicken
taken from Lemon Chicken, Simply Recipes

Ingredients
- 1-2 pounds of chicken thighs, legs, and/or breasts, skin on
- 1 Tbsp of lemon zest
- 1/6 (just take a 1/3 cup and only fill half of it) cup of lemon juice
- 1 garlic glove, crushed
- 1 Tbsp of fresh thyme, chopped (or 1 tsp dried)
- 1 Tbsp of fresh rosemary, chopped (or 1/2 tsp dried)
- 1/2 tsp salt
- 1/2 tsp black pepper
- 1 Tbsp butter, melted
Tools
- freezer bag or plastic container with lid
- baking dish
- pastry brush

Steps
1. Place lemon juice, lemon peel, garlic, thyme, rosemary, salt, and pepper in a small bowl, whisk to combine. With the tip of a sharp knife, cut into each chicken piece one or two times by about 1/2 an inch. (This will help the marinade penetrate.) Place the chicken pieces and the marinade in a freezer bag or plastic container with a lid. Rotate the bag/container so that all chicken pieces are coated with the marinade. Seal the bag/container and place in the refrigerator (if using a plastic bag, place bag in a bowl in case of leakage). Let marinate for at least 2 hours.

2. Preheat oven to 425°F. Remove chicken from marinade and place in a single layer in a baking dish, skin side up. Use a pastry brush to brush a little melted butter on to each piece of chicken.
3. Bake for a total of 30 minutes, until the skins are crispy brown, and the chicken is cooked through, juices running clear (breasts have an internal temperature of 165°F and thighs 175°F).

Depending on the size of the breasts, they may be ready before the thighs, so if you are cooking a mix of chicken parts, keep that in mind, you may have to take them out of the oven before the thighs.

Let rest, covered in foil, for 10 minutes before serving.

Serves 2, alone or with white or brown rice.

A few tips...
...I didn't have any fresh herbs or those specific dried herbs available, so I used the next best thing I can find in my kitchen cabinet - Italian Seasoning (a mix of 7 different herbs, including thyme and rosemary!).  If you don't have those herbs, you can try to find something close.  It's OK if you don't have exactly thyme or rosemary, or only have one.
...when dealing with raw chicken, remember to wash your hands before you touch anything else.  Say no to E.Coli!
...make sure the chicken is cooked thoroughly.  When in doubt, take out the chicken and cut it through with a knife.

Friday, April 2, 2010

Oranges!

Thanks to our neighbors, it's Orange Season in our backyard!  Lucky for us, our neighbor's orange tree branches are overgrown and peep into our side of the yard.  We've been eyeing these oranges out of our bedroom window for a couple of weeks now, and finally today, out of pure boredom and tired from TV-watching, I jumped out with my bike basket and yanked as many oranges out of the tree as I possibly could.  It was exhilarating!  I really want to grow my own fruit trees and vegetables now.


Valencia oranges are ripe starting from March to May.  They are juicy and so sweet! Do I foresee orange recipes in the near future... hmmm?